Bagnall Annie 042t in o9 - click to buy from shapeways
After having produced Sipat, I started to see other small locos produced by Bagnall which shared common parts. The Groudle Glen Railway on the Isle of Man had 3 locos which had similar cylinders, boilers, wheels and the same 2'6" wheelbase as Sipat - Sea Lion, Polar Bear, Annie, and they've started work on a replica of Polar Bear (to be called Brown Bear). Sea Lion and Polar Bear are a pair of very similar 240T (Polar Bear is no longer resident, but has been back to visit). They are all 2ft gauge of course, but they're very small. Sea Lion and Polar Bear are quite a bit smaller than Sipat and most of my 18" locos (this doesn't rule out the possibility that I'll produce them in the future), but Annie is the same height and width as Sipat and my stock. What makes this most unusual is that the Groudle Glen's Annie is a replica of a 2'6" loco originally built for a small tramway in New Zealand (works No. 1922 of 1911). So my model is an 18" gauge model of a 2' gauge loco which was a replica of a 2'6" engine....
Although at first glance most of the fittings look the same as on Sipat, some perfectionist tendencies crept in as I looked at photos and drawings, so I redraw most of the supposedly common parts! The smokebox saddle ribs are different, the cab fittings are on opposite sides, there are 2 gauge glasses instead of one, the smokebox and cylinders are slightly longer.... But I'm happy with the finished model, even if I did make a lot of extra work for myself that nobody notices!
The finishing of the 3D print uses the same techniques as my other models (more details are on the page for Sipat or the Y7 - links on the left) of sanding with 1600 grit paper, bits of fine sanding sponge, and spraying with Halfords Filler Primer. Just repeat the process until you have a smooth surface. The pipewor can be added (using wire or very thin brass rod - about 0.3-0.4mm). Cab supports are 1mm brass rod, and the roof should be 42mm above the footplate. The brake handle is bent up from 0.4mm brass rod and inserted into the printed hole, a staple is bent into shape for the regulator, and fitted into the preprinted hole. Handrails are 0.35mm wire. The smokebox dart is an Alan Gibson 4mm scale product (although any 4mm scale smokebox dart would work equally well). Sadly Shapeways, for reasons best known to themselves, claim to be unable to print the smokebox dart (despite it being identical to that on Sipat).
Once the surface is smooth (and not before - there is no need to leave be visible layering on a 3D printed model - mine don't have any) give it a coating of Klear (or Johnson's Multi Surface floor wax or whatever they're calling it now). Once that dries the usual Archer rivet transfers are applied, then sealed with another coat of klear before painting.
Now is the ideal time to weight the body. as it is a 042T with a fairly long rear overhang, you need to move the centre fo gravity as far forward as you can, so the smokebox/saddle/boiler should be filled with lead shot and gleu (epoxy or UHU, do not use PVA or a PVA based woodglue as there is a risk it will react with the lead). I superglue a piece of paper over the hole in the bootom of the smokebox saddle, then fill it from the other end and glue it up. You should also fill the side tanks (equally!) with lead shot, then glue then opening so it stays in place. You can make it surprisingly heavy, which is needed for traction and to counterbalance the rear overhang and the motor hanging outside the coupled wheelbase.

All rivets on the sides and rear are the closely spaced ones from Archer 88016. There are rievts along all edges of the front and top of the side tanks also, and along the rear fo the smokebox where the tank brackets attach. 6 of the widely spaced rivets are on the cylinders tops. There are 2 lines of widely spaced rivets on the cab roof (in line with the supports). Widely spaced rivets are also used on front and rear bufferbeams - a single line across the top of the bufferbeam, with a double line on each side of the coupler where the frames would attach to the rear. (same pattern as on Sipat).
After riveting, make sure that you've given it a coat or two of Klear to fix the rivet transfers in place. I painted my loco with Halfords Matt Black spray (as always - I do have a model T like fixation with producing black steam locos. Only one of all my steam locos has been a colour other than black (dark green). Funnily enough my diesels always end up dark green!
Chassis
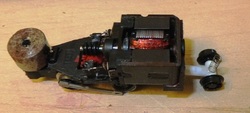
The plastic footplate on the Fleischmann 7000 chassis is cut back in the same way as on Sipat (there are more photos on that page, but basically you chop the cylinders off the front, then cut the sides back at an angle. If you don't want a red chassis/frames, I used vallejo grey urethane primer followed by matt black acrylic paint and matt varnish. Anything that moved (gears!) was NOT painted, but coloured in with a black permanent marker, which doesn't clog them up and it runs very nicely. Can't praise the robustness of these little Fleischmann 7000s enough!
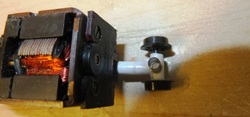
The Pony truck is a very simple job. I used the rear coupler from the fleischmann chassis (including the little silver centring spring) as the pivot. Simply cut the coupler face off, leaving the straight shaft. I then dug out some plastic tube (fake chinese made plastruct, from eBay!) which was a push fit on the shaft. This longitudinal piece has a horizontal vee filed into one end (make sure it is the correct length to hold the pony wheels in the centre of the frame cutout when the main chassis is correctly located with regard to the valve gear/cylinders - test fitting is essential before you glue anything!). A second piece of tubing was used to hold the axle of a Peco spoked n gauge wagon wheel. Annie's trailing wheels are 9" diameter, which is about 5.5mm, so these tiny wheels are the correct size. The peco axles need to be filed smooth (often there are bumps moulded into the axle itself) and the pinpoints removed flush with the wheel.The axle tube has a horizontal cut in it, which allows you to prise it open with a small screwdriver and insert the axle.I then plasticwelded it to the longitudinal tube, making sure the axle tube is centred and the join is level and horizontal. The longitudinal tube is then carefully superglued to the coupler shaft. This doesn't give enough force to hold the pony wheels on the track at high speed. There are two possible ways to fix this: Either attach lead to the pony truck to weigh it down (but I'd ran out of lead sheet), or use a spring to push it down. A rummage through my bits boxes produced a couple of nice soft compression springs (I think they might've come from the couplings on a very old Farish Mk1 coach). One of these was superglued to the pony truck, making sure it is in the centre of the axle and vertical. This pushes against the cab floor, and holds the wheels on the track. It allows for (recklessly - the curve is on a viaduct) high speed runs forward and backwards over 9" curves and peco 009 points, and performs very well in service. The slight lateral springing afforded by using the coupler and spring helps a little to steer the loco, rather than the pony truck just waggling about.
Positioning the chassis is important! on Annie the wheelbase is set further to the rear than on Sipat. Basically as far from the cylinders as the valve gear/connecting rod will reach to! There may be some variation in this, so I've left 'room' in the frames for the body. As a guideline mine has 2mm microstrip at front and rear of the chassis to hold it in the correct place (I could try and tighten this up in CAD, but it depends how much you've filed the front/rear ends of the chassis back, and making alterations to the CAD might make shapeways fine another spurious version to reject it - this is version 4, and once they've printed something they flag it as printable and reduce the amount of checks needed. Reuploading the CAD will remove it's current 'passed' status!). I also shimmed up the front end of the chassis below the smokebox by 0.7mm with styrene. Whether or not this is necessary is down to how much you've filed down the front end of your chassis. The best way to check is to wait until you have the pony truck and everything in place, then put the loco on some flat, straight track and measure the distance from the bottom of the buffer beams to the rail tops - obviously you want this to be equal at front and rear. On my loco its a shade under 2mm both ends.
Finishing touches
This is about the stage where my model is at now. I'm just starting to paint it up, but it is a beautifully smooth runner. A little longer than Sipat, with a bigger boiler, but still smaller than most of the woolwich arsenal 18" locos (I suspect it might be a similar size to their earlier 18" 042IST Serapis which ran at woolwich). My Annie runs fine with a whitemetal driver on the footplate, but I think that a plastic, lightweight driver will be a better long term occupant. I have not yet fitted couplings. The front coupling will be fixed, the rear one might be able to be a fixed coupling, or I may articulate it (there is scope to attach it to the pony truck, but I wonder if hanging a full train off it might affect the tracking of the pony wheels). This will be determined during running trials by temporarily fixing the rear coupler in different ways and seeing how it goes. If you have more generous curves than 9", a fixed one might work out. The rear overhang is only about 12mm longer than on my Ozymandias (the Bagnall 040IST), which works perfectly with fixed couplings, so we'll see.
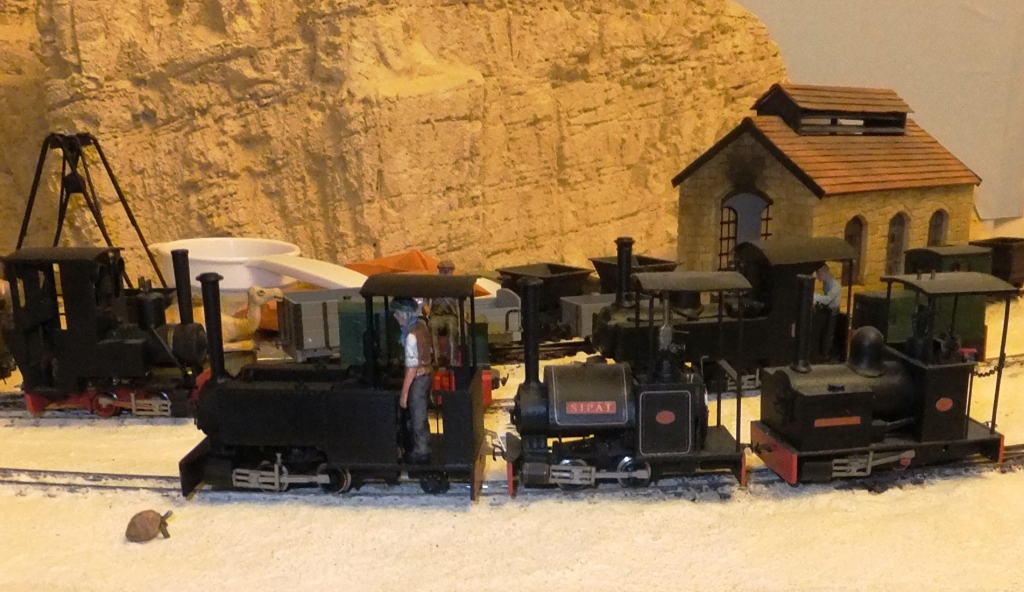
Annie with the rest of my little family of Bagnalls (Sipat in the centre, Ozymandias at right) somewhere in Sudan (with Leo70, a tea strainer, my Mallet and a couple of diesels in the background). Although a 2'6" or 2' prototype, it certainly isn't out of place with my other 18" gauge Bagnalls. I really ought to get on with the layout instead of producing yet more locos! Incidentally every steam loco pictured uses the Fleischmann 7000 chassis (the mallet uses 2, one unpowered, and Ozymandias is converted to outside frames using plasticard, with cranks filed from 0.7mm thick microstrip). I still have another couple of them in my drawer....
Where next... I need to get some name and works plates from Narrow Planet (same pattern/size as Sipat). Steve at Narrow Planet has offered to produce the cab handwheels on the same etch, I just need to tidy up my CAD and send it to him (Shapeways won't print them any more - in spite of printing at least 40 sets of them over the past year, they've now said they're unprintable... I don't have the heart to tell them the exact same handwheel is in the cab of Leo70 and they print it fine!). Once Annie is finished I'll put some more pictures up, but my real job is getting busier at this time of year, and the recent arrival of our first child has impacted a little on my modelling time. There are not many locos left in the small Bagnall family, but I do hope to produce Rishra (preserved at Leighton Buzzard). Of course Rishra is a Baguley product, but E.E. Baguley was the Cheif Draughtsman at Bagnall responsible for the design of Sipat and her cousins, so there is considerable family resemblance and commonality of features. After that Sea Lion and Polar Bear would be the only remaining designs, but I'm not promising anything.
