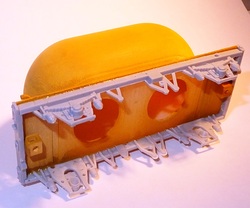
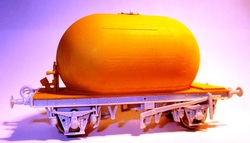
CIE Cement bubble wagon in 4mm/ft (00).
A 3D printed bodyshell to be used in conjunction with the Dapol 00 gauge Prestwin kit (for the underframe) and the excellent detailing etch from Studio Scale Models (kit A02).
This model came about after a request from my Father, who has an interest in Irish Railways. He provided me with a scan of a CIE works drawing and told me he wanted a dozen of them. The underframe of the Dapol Prestwin is used by many Irish modellers as it is pretty much spot on for a number of CIE designs. The distinctive Bubble design is a little tricky to scratchbuild, and Dad didn't like the running qualities or detail of some of the other Bubble models he's had.
This model came about after a request from my Father, who has an interest in Irish Railways. He provided me with a scan of a CIE works drawing and told me he wanted a dozen of them. The underframe of the Dapol Prestwin is used by many Irish modellers as it is pretty much spot on for a number of CIE designs. The distinctive Bubble design is a little tricky to scratchbuild, and Dad didn't like the running qualities or detail of some of the other Bubble models he's had.
CLICK HERE TO BUY a CEMENT BUBBLE On shapeways
click here to buy the 4 pack on shapeways
(Shapeways charge a 5 Euro fixed rate on all FD/FUD items, plus the cost per volume of material. By putting 4 models in one file you can save a bit of money. There is a slightly higher risk of problems though).
Assembly instructions
Unlike my loco models, for these wagons I'd recommend using Frosted Detail (FD). It is the same material as FUD, but from a lower resolution machine. The quality is more than good enough though. As always, the first step is to wash the prints in Isopropyl Alcohol to remove wax residues. Others have had success with different cleaning materials (soap, white spirit etc), but I've always just used alcohol and had no problems.
Once the model has been washed, give it a sand down with 800 grit or so paper to remove any stepping/ridges from the printing process. This first sand doesn't need to give a perfect finish as we will be priming it and sanding it later on.
I then sprayed the models with Halfords Yellow Filler Primer. This does 2 things: Firstly it helps smooth the surface and makes the imperfections a little more visible so you can make sure everything is smooth with spots of further sanding. Secondly, I've tried for ages to photograph FD/FUD and never had much luck. At least once it is yellow I can take pictures of it for you!
Start assembling the Dapol solebars and bufferbeams onto the chassis. I use Screwfix's cheap superglue for this. If you are planning on using tension lock couplings it is best to cut off the two downward projections on the bufferbeams before sticking them on as it can be awkward to remove them once the wagon is built (says the voice of experience). There are ridges on the underside of the body to make sure you get them in the right places. One thing to be aware of is that the Dapol moulds are quite old, so sometimes there may be a lot of flash to clean up. Occasionally you find a slightly warped solebar. This is easily dealt with by bending it back to straight and quickly glueing it firmly to the body.
Once the Cyano is dry, I run a spot of plasticweld into the styrene/styrene joins on the corners just to strengthen them.
Once the Cyano is dry, I run a spot of plasticweld into the styrene/styrene joins on the corners just to strengthen them.
At this point it is prudent to pop the wheels in and make sure it rolls OK. If it doesn't, it is probably down to the solebars being slightly warped. any slightly wonky axleboxes can be bent gently back to vertical. Don't go any further until you've got it rolling nicely.
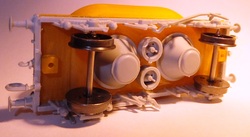
The discharge chutes from the Dapol kit are used. There are 2 circular depressions around the holes in the body for them to fit in to. Before glueing them in, I fill them up with lead or other metal to give the wagon some weight (glue ti in so it won't rattle about). Incidentally most of my wagons are weighted with some chopped up 7mm scale whitemetal figures I had in a box. They were awful castings, this is probably the only way they'll see use on a layout!
The rest of the Dapol chassis detailing parts are also added using plasticweld/mekpak or similar. The brake hoses are the wrong shape, but the person I was building this for said just to stick the kit ones on. be aware that you'll need to chop off the awful moulded coupling links from the Dapol hooks if you intend to use tension lock couplings.
The brakes are slightly different though.
The brakes are slightly different though.
The Bubble only has a single brake shoe on each wheel, whereas the Dapol Prestwin has 2. This means you get 4 brake shoes for the bits box, and you superglue the other 4 to the underside fo the body on the inner sides of the wheels. If you press them onto the rear of the soleboar it gives a stronger join.
The body allows you to reuse the top hatch from the Dapol Kit which looks about right. There is a more accurate one on the Studio Scale Models etch which you can use if you'd rather. The etch also contains some small levers for the solebars. The surplus pipework on the Dapol sprues coudl be used for extra detailing using photos for reference - there seem to be some detail differences. The end pipework is printed with the body, so you don't have to put any other pipes on if you don't want to.
The body allows you to reuse the top hatch from the Dapol Kit which looks about right. There is a more accurate one on the Studio Scale Models etch which you can use if you'd rather. The etch also contains some small levers for the solebars. The surplus pipework on the Dapol sprues coudl be used for extra detailing using photos for reference - there seem to be some detail differences. The end pipework is printed with the body, so you don't have to put any other pipes on if you don't want to.
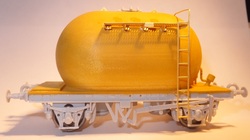
The printed body has several useful marks on it. On one end there are two small holes for the handrails to fit into. These will need opening up with a small drill (about 0.5mm diameter or so). There are two small indentations to help you locate the lift rings from the etch on the top, and on each side there is a line showing where the walkway should go (one end of the walkway lines up with the lift ring, the other lines up with the handrail hole). At least with the lines on you can easily get them level!
The etched parts just fold up and are superglued on. Once the walkway is in place, the ladder/handrail is bent to shape and glued on to the body, the walkway, and to the solebars. Then repeat on the other side.
The etched parts just fold up and are superglued on. Once the walkway is in place, the ladder/handrail is bent to shape and glued on to the body, the walkway, and to the solebars. Then repeat on the other side.
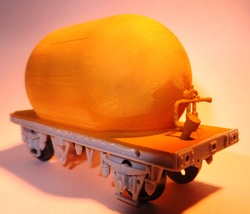
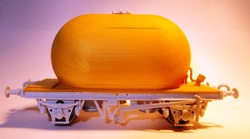
With the model built, you now need to paint it. A bit fo sellotape/masking tape/blu-tak over the axle bearings will stop paint getting into them. I use Halfords Grey Primer all over, then paint the underframe black and the bubble with LNER Wagon Grey. Detail parts (some of the pipework) are picked out in red, the bottom of the ladder in white.
Decals are available from SSM, but I'm afraid most of the bubbles didn't have much in the way of visible lettering by the end of their careers, so I've just used some of the numbers/details from the Dapol kit transfers (the electric flashes are perfect, but they only give you one!)
Once decals are on, the whole thing needs weathering. Almost all the bubbles I've seen were pretty scruffy. a toothpaste and water mixture gives a good cement staining, with various weathering powders and drybrushing used as well.
Fix the couplings on using a reliable RTR wagon as a height guide - you may need to put some styrene shims on the coupling to get it to the right level. Then you are finished!
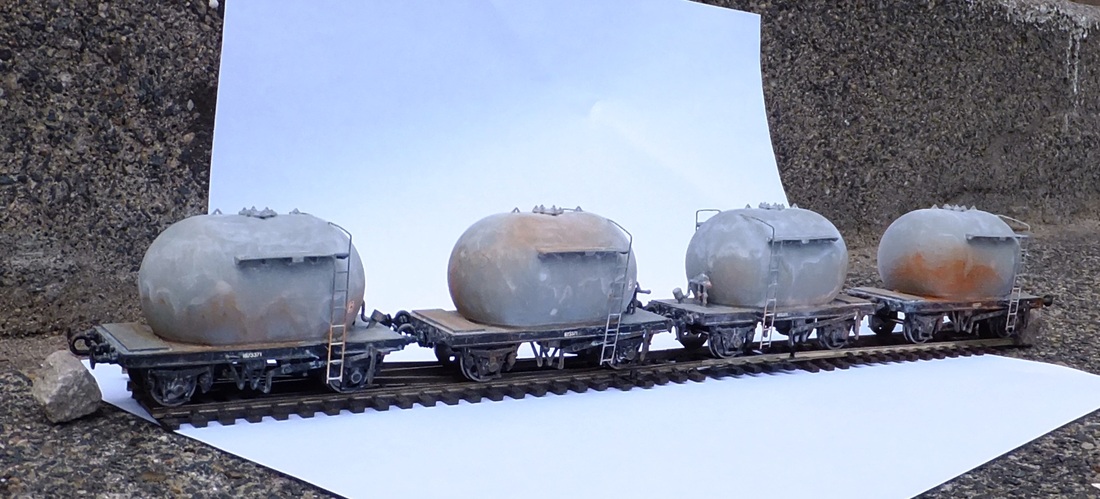
A Batch of 4 wagons built up for my Dad. I've just reused the transfers from the Dapol kit, and haven't put couplings on yet, but they certainly look the part.
