Click here to visit my shapeways shop
The first model I have produced. The Sipat class was a family of extremely small 040st produced by Bagnall to gauges between 18" and 2'. More information and photographs of these locos can be found on Henrik Laurell's excellent website, which is full of useful information on 18" railways, Mark Smithers' 18" gauge steam railways book, and the recent book on the John Knowles system. This product is available from the Brack Models Shapeways shop. This page is intended to help people complete their models.
As an O9 modeller, the first thing that struck me when I had a look at the Sipat class drawings in the John Knowles book was that the wheelbase of 2'6" scaled out correctly for the fleischmann 7000 chassis which I had several of and had previously used to build two other O9 locos on. This chassis is reliable, easily serviceable, and commonly available on the secondhand market as it is the loco in the fleischmann n gauge starter set. Many of mine have come from ebay.de as they tend to be a little cheaper over there than here, but they do crop up cheaply in the UK. I wouldn't recommend buying a new one as they cost a fortune, but expect to pay £30-35 secondhand in the UK.
As well as the wheelbase being perfect, the wheel size is also correct as the sipat class was built with extremely small wheels. The only major dimensional compromise on the model is that the firebox and cab have been lengthened by 1mm to fit the fleischmann motor, though it still captures the look of the prototype and I doubt anyone would've noticed this if I hadn't mentioned it.
The model itself was drawn using Rhino3D and printed in Frosted Ultra Detail at Shapeways. I'm afraid that due to the small details and the surface finish it isn't possible to make it in a less detailed material. Bear in mind that FUD is not the strongest of meterials, and therefore that small details can be broken off if you're not careful. If you do, then either superglue the bits back together, or use some thin plastic rod or wire to replace the little bit you've knocked off (which would make it stronger in future). If you really manage to break everything off, then I do sell a pack of fittings from Sipat for scratchbuilders on shapeways. If you look at the photos of the models on this page, bear in mind that they're much bigger than life size - the actual model is 28mm wide and about 65mm long. I haven't used any type of surface filler, and I feel the surface finish is perfectly acceptable and compares well to whitemetal kits such as the springside Beyer, Peacock/Horwich locos.
Many people have commented on the standard of finish available on 3D printed model trains. Though the finish is not completely flat, it only needs about 30 minutes work to get a very good finish on your Sipat class. Once you've unpacked the loco body, the first thing to do is check that no major parts are missing. sadly Shapeways do sometimes break off parts when cleaning up the models they print. If this has happened then parts can be easily reattaached using superglue (if you want a brand recommendation, I'm afraid I use the cheapest screwfix superglue, its only about £1.50 for a decent sized bottle and does the job). Should there be major problems with the print, please contact shapeways customer service, they're very helpful and reply promptly in my experience.
Step 1: Washing
During printing the parts of the model are supported by a waxy material. Residues of this will be left on your model, I have heard acetone suggested to remove it, but I have used Isopropyl alcohol to clean mine and it seems to work fine. You may also need to use a cocktail stick or very small screwdriver to remove build ups in corners of the model.
Step 2: Surfacing
Using a small flat jewellers file in circular motions, you can gently sand off small surface imperfections. For most of the sanding work I use some 1600 grit sandpaper to smooth off the printing marks. The other secret weapon is Gunze Mr Surfacer 1200, which is a liquid filler I bought from Hong Kong via eBay. It dries very quickly and does a wonderful job of filling the traces of layering left by the 3D printign process. My second Sipat has a mirror like shine on the saddle tank from a coat or two of Mr Surfacer and some sanding. The model appears to be prone to getting a bit of a printing mark down the centre of the saddle tank, but this will file down easily. remember to be careful of the small detail parts (keep the superglue handy). One tool I made which I find handy is a bamboo barbeque skewer which I've wrapped some 1600 grit around the end of and secured it with superglue. This is handy for smoothing awkward to reach spots (the end of it is visible in one of the pictures). Once you're happy with the surface, give the model a wash - water should be fine this time, or you can use the alcohol if you like. You will need to drill out the tiny holes for the handrails, handbrake and cab supports. The cab supports need to be 1mm brass rod and the centre of the cab roof should be 6' (42mm) above the footplate (people were shorter in those days!), the handrails are 0.5mm diameter, try to use straight rod as this will strengthen the cab sides (the left cab side doesn't have as much to support it, but I didn't want to make it thicker). The rear cab rest fits on the cab supports and should be the same height as the cabsides. The handbrake column should be about 0.8mm in diameter. The pipe to the right side of the smokebox should also be made from a bit of wire, but I wouldn't fit it until after painting, though you might like to drill a little hole for it now. If you want ot make an open cab model, just leave the cab off, though you might also want to shorten the safety valve bonnet, or scratchbuild a new one (the one on the green loco is made from plastic rod, old guitar string and some scrap brass).
Step 3: Klear
Once I'm happy with the smoothness of the surface, I give the model a coat or two of Pledge Multi Surface Wax (new Klear) which can be found in your favourite supermarket. Use a small paintbrush and try to avoid buildups in corners. Klear is self levelling and quick drying, and provides a perfect surface for applying Archer Rivet transfers (I use the Archer transfers rather than printing the rivets as this allows you to smooth the surface properly).
Step 4: Riveting
I use two methods to apply rivets. Firstly, for straight lines of rivets, I use Archer Rivets no. 88016 as it works out cheaper than their O scale rivets, but they're about the same size. Cut the rivets you need with a scalpel, soak them in water, and slide them on to the model. Once all the rivets are on and dried, carefully put a thin coat of klear over them to hold them in place. For the two curved lines of rivets on the front of the saddle tank I used EvoStik Resin W wood glue dotted on with the end of a cocktail stick. You can get lines of rivet transfers in various radii from micromark, but they ask for $18 to post an A4 sheet of these to the UK, so I haven't tried them (and they didn't reply when I asked if they could just put them in an envelope with a $1.85 airmail stamp on it). Now is a good time to use some epoxy and lead shot to fill the smokebox and saddle tank to give your loco a little more weight and pulling power (you'll notice I left it hollow), just make sure your motor can still fit in. At this point you should also get some thin wire and make the pipework for the cab. There are lots of pictures of larger bagnall narrow gauge 040ST on the internet, the piping follows the same general pattern.
Step 5: Chassis modifications
The fleischmann 7000 is a reliable little beast, and very easy to dismantle. If you remove the screw beneath the front of the loco the body will come off. You now must remove the two screws holding the motor down, so you can get at the plastic assembly on top of the chassis with the cylinders and pickups on it. Don't lose the screws!
once you've got the motor off, then you can unclip the valve gear. This will fit into the cylinders on your Bagnall, so keep them safe (if its a bit of a tight fit then just ream out the cylinders with a needle file). I used a big pair of scissors to make the modifications to the pickup assembly, so you shouldn't need any other tools apart from a soldering iron. Rather than trying to explain what to cut/not to cut, I'll put a few pictures up below - you need to make it similar to the black painted version. I cut off the suppressors/chokes for the motor and soldered wires across the gap - this doesn't seem to affect performance but certainly helps appearance, and nobody has complained about their TV reception so far. You also need to remove the buffers and front bufferbeam from your chassis - a razor saw is handy hear, especially if you have one of the metal versions. Both metal and plastic versions of the Fleischmann 7000 can be used, I have one of each. The metal chassis will give you a bit more weight and probably run slightly better, but the plastic one is fine. If you don't want a red chassis, then a coat of Vallejo Grey Polyurethane primer will allow you to paint it the colour of your choice. If you keep it red, then I find Humbrol bufferbeam red is a close enough match for the 3D printed parts of the frames.
Step 6: Prime and Paint
Obviously you probably have your own preferred paints and methods, but in case anyone is interested I use Halfords acrylic spray primer, in grey. for black locos, I use Halfords matt black acrylic spray. I only use acrlic paints, so areas that need to be red I undercoat with citadel/games workshop's Foundation Macharius Solar Orange, then paint with Humbrol Buferbeam red. the green open cab Sipat was painted with Citadel's Dark Angels Green. For weathering I use the carrs powders, though turmeric, cumin and cinnamon are occasionally borrowed from the kitchen! If you want works plates or name plates I strongly recommend Narrow Planet. They've made all my name and works plates, are cheap, and will pretty much make anything you want to any size if you email them. If you wish to order name and works plates for this loco Steve has very kindly made a set of the correct pattern and size available if you click this link. I believe you can still specify different works numbers or names, but my Sipat plates are fantastic!
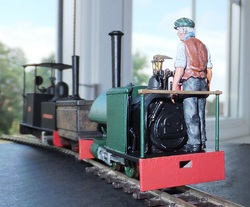
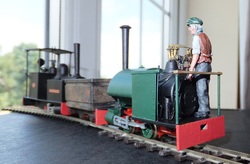
You will notice there's not much room for a driver in the cab - I suggest a slim plastic figure, perhaps a 1/48 one demobbed from military service. A chubby whitemetal driver may result in your loco doing wheelies if you accelerate fast!
As an O9 modeller, the first thing that struck me when I had a look at the Sipat class drawings in the John Knowles book was that the wheelbase of 2'6" scaled out correctly for the fleischmann 7000 chassis which I had several of and had previously used to build two other O9 locos on. This chassis is reliable, easily serviceable, and commonly available on the secondhand market as it is the loco in the fleischmann n gauge starter set. Many of mine have come from ebay.de as they tend to be a little cheaper over there than here, but they do crop up cheaply in the UK. I wouldn't recommend buying a new one as they cost a fortune, but expect to pay £30-35 secondhand in the UK.
As well as the wheelbase being perfect, the wheel size is also correct as the sipat class was built with extremely small wheels. The only major dimensional compromise on the model is that the firebox and cab have been lengthened by 1mm to fit the fleischmann motor, though it still captures the look of the prototype and I doubt anyone would've noticed this if I hadn't mentioned it.
The model itself was drawn using Rhino3D and printed in Frosted Ultra Detail at Shapeways. I'm afraid that due to the small details and the surface finish it isn't possible to make it in a less detailed material. Bear in mind that FUD is not the strongest of meterials, and therefore that small details can be broken off if you're not careful. If you do, then either superglue the bits back together, or use some thin plastic rod or wire to replace the little bit you've knocked off (which would make it stronger in future). If you really manage to break everything off, then I do sell a pack of fittings from Sipat for scratchbuilders on shapeways. If you look at the photos of the models on this page, bear in mind that they're much bigger than life size - the actual model is 28mm wide and about 65mm long. I haven't used any type of surface filler, and I feel the surface finish is perfectly acceptable and compares well to whitemetal kits such as the springside Beyer, Peacock/Horwich locos.
Many people have commented on the standard of finish available on 3D printed model trains. Though the finish is not completely flat, it only needs about 30 minutes work to get a very good finish on your Sipat class. Once you've unpacked the loco body, the first thing to do is check that no major parts are missing. sadly Shapeways do sometimes break off parts when cleaning up the models they print. If this has happened then parts can be easily reattaached using superglue (if you want a brand recommendation, I'm afraid I use the cheapest screwfix superglue, its only about £1.50 for a decent sized bottle and does the job). Should there be major problems with the print, please contact shapeways customer service, they're very helpful and reply promptly in my experience.
Step 1: Washing
During printing the parts of the model are supported by a waxy material. Residues of this will be left on your model, I have heard acetone suggested to remove it, but I have used Isopropyl alcohol to clean mine and it seems to work fine. You may also need to use a cocktail stick or very small screwdriver to remove build ups in corners of the model.
Step 2: Surfacing
Using a small flat jewellers file in circular motions, you can gently sand off small surface imperfections. For most of the sanding work I use some 1600 grit sandpaper to smooth off the printing marks. The other secret weapon is Gunze Mr Surfacer 1200, which is a liquid filler I bought from Hong Kong via eBay. It dries very quickly and does a wonderful job of filling the traces of layering left by the 3D printign process. My second Sipat has a mirror like shine on the saddle tank from a coat or two of Mr Surfacer and some sanding. The model appears to be prone to getting a bit of a printing mark down the centre of the saddle tank, but this will file down easily. remember to be careful of the small detail parts (keep the superglue handy). One tool I made which I find handy is a bamboo barbeque skewer which I've wrapped some 1600 grit around the end of and secured it with superglue. This is handy for smoothing awkward to reach spots (the end of it is visible in one of the pictures). Once you're happy with the surface, give the model a wash - water should be fine this time, or you can use the alcohol if you like. You will need to drill out the tiny holes for the handrails, handbrake and cab supports. The cab supports need to be 1mm brass rod and the centre of the cab roof should be 6' (42mm) above the footplate (people were shorter in those days!), the handrails are 0.5mm diameter, try to use straight rod as this will strengthen the cab sides (the left cab side doesn't have as much to support it, but I didn't want to make it thicker). The rear cab rest fits on the cab supports and should be the same height as the cabsides. The handbrake column should be about 0.8mm in diameter. The pipe to the right side of the smokebox should also be made from a bit of wire, but I wouldn't fit it until after painting, though you might like to drill a little hole for it now. If you want ot make an open cab model, just leave the cab off, though you might also want to shorten the safety valve bonnet, or scratchbuild a new one (the one on the green loco is made from plastic rod, old guitar string and some scrap brass).
Step 3: Klear
Once I'm happy with the smoothness of the surface, I give the model a coat or two of Pledge Multi Surface Wax (new Klear) which can be found in your favourite supermarket. Use a small paintbrush and try to avoid buildups in corners. Klear is self levelling and quick drying, and provides a perfect surface for applying Archer Rivet transfers (I use the Archer transfers rather than printing the rivets as this allows you to smooth the surface properly).
Step 4: Riveting
I use two methods to apply rivets. Firstly, for straight lines of rivets, I use Archer Rivets no. 88016 as it works out cheaper than their O scale rivets, but they're about the same size. Cut the rivets you need with a scalpel, soak them in water, and slide them on to the model. Once all the rivets are on and dried, carefully put a thin coat of klear over them to hold them in place. For the two curved lines of rivets on the front of the saddle tank I used EvoStik Resin W wood glue dotted on with the end of a cocktail stick. You can get lines of rivet transfers in various radii from micromark, but they ask for $18 to post an A4 sheet of these to the UK, so I haven't tried them (and they didn't reply when I asked if they could just put them in an envelope with a $1.85 airmail stamp on it). Now is a good time to use some epoxy and lead shot to fill the smokebox and saddle tank to give your loco a little more weight and pulling power (you'll notice I left it hollow), just make sure your motor can still fit in. At this point you should also get some thin wire and make the pipework for the cab. There are lots of pictures of larger bagnall narrow gauge 040ST on the internet, the piping follows the same general pattern.
Step 5: Chassis modifications
The fleischmann 7000 is a reliable little beast, and very easy to dismantle. If you remove the screw beneath the front of the loco the body will come off. You now must remove the two screws holding the motor down, so you can get at the plastic assembly on top of the chassis with the cylinders and pickups on it. Don't lose the screws!
once you've got the motor off, then you can unclip the valve gear. This will fit into the cylinders on your Bagnall, so keep them safe (if its a bit of a tight fit then just ream out the cylinders with a needle file). I used a big pair of scissors to make the modifications to the pickup assembly, so you shouldn't need any other tools apart from a soldering iron. Rather than trying to explain what to cut/not to cut, I'll put a few pictures up below - you need to make it similar to the black painted version. I cut off the suppressors/chokes for the motor and soldered wires across the gap - this doesn't seem to affect performance but certainly helps appearance, and nobody has complained about their TV reception so far. You also need to remove the buffers and front bufferbeam from your chassis - a razor saw is handy hear, especially if you have one of the metal versions. Both metal and plastic versions of the Fleischmann 7000 can be used, I have one of each. The metal chassis will give you a bit more weight and probably run slightly better, but the plastic one is fine. If you don't want a red chassis, then a coat of Vallejo Grey Polyurethane primer will allow you to paint it the colour of your choice. If you keep it red, then I find Humbrol bufferbeam red is a close enough match for the 3D printed parts of the frames.
Step 6: Prime and Paint
Obviously you probably have your own preferred paints and methods, but in case anyone is interested I use Halfords acrylic spray primer, in grey. for black locos, I use Halfords matt black acrylic spray. I only use acrlic paints, so areas that need to be red I undercoat with citadel/games workshop's Foundation Macharius Solar Orange, then paint with Humbrol Buferbeam red. the green open cab Sipat was painted with Citadel's Dark Angels Green. For weathering I use the carrs powders, though turmeric, cumin and cinnamon are occasionally borrowed from the kitchen! If you want works plates or name plates I strongly recommend Narrow Planet. They've made all my name and works plates, are cheap, and will pretty much make anything you want to any size if you email them. If you wish to order name and works plates for this loco Steve has very kindly made a set of the correct pattern and size available if you click this link. I believe you can still specify different works numbers or names, but my Sipat plates are fantastic!
You will notice there's not much room for a driver in the cab - I suggest a slim plastic figure, perhaps a 1/48 one demobbed from military service. A chubby whitemetal driver may result in your loco doing wheelies if you accelerate fast!
Photos to aid construction and chassis modification
the model
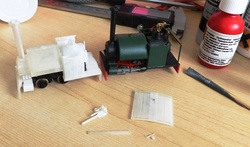
The bits you should get from shapeways. I have already done some smoothing work. The little stick with the sandpaper on is my home made fine sanding tool for awkward spaces.
On this one the safety valve bonnet had been snapped off by shapeways, but it just takes a bit of superglue to put it back on.
The print line in the middle of the cab roof has actually been sanded smooth, but the translucent nature of the material makes it look as though it may still be there.
On this one the safety valve bonnet had been snapped off by shapeways, but it just takes a bit of superglue to put it back on.
The print line in the middle of the cab roof has actually been sanded smooth, but the translucent nature of the material makes it look as though it may still be there.
Dismantling your chassis
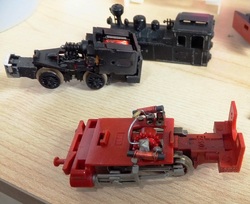
This is what you should get after removing the motor screws and motor. You need to keep the valve gear parts - just pop out the top of the bracket from the red plastic pickup assembly. You will need to trim the top of the brakets afterwards as pictured in the photos of the green loco.
In Bits
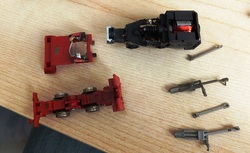
The pickup assembly will unclip if you put a small screwdriver under the back of it, being careful not to damage the main gear. You need to remove any buffers (if they haven't already snapped off), and the side extensions of the front bufferbeam. Using scissors or snips cut the pickup assembly to the same shape as the black one in the photo.
Pickup assembly before and after
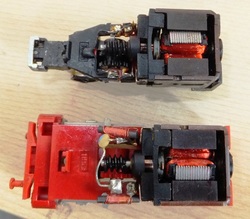
The lower one is what you start with, whilst hopefullly you'll end up with something that looks like the top one. The motor chokes have been removed, but the capacitor is still there. I have painted everything black so it will be less visible. I'm afraid I'm much too poor to afford DCC, so if you're trying to put a chip in here I can't help, though there is some room inside the saddle tank, but you'd be sacrificing weight to get one in there, and I'd personally rather have the weight.
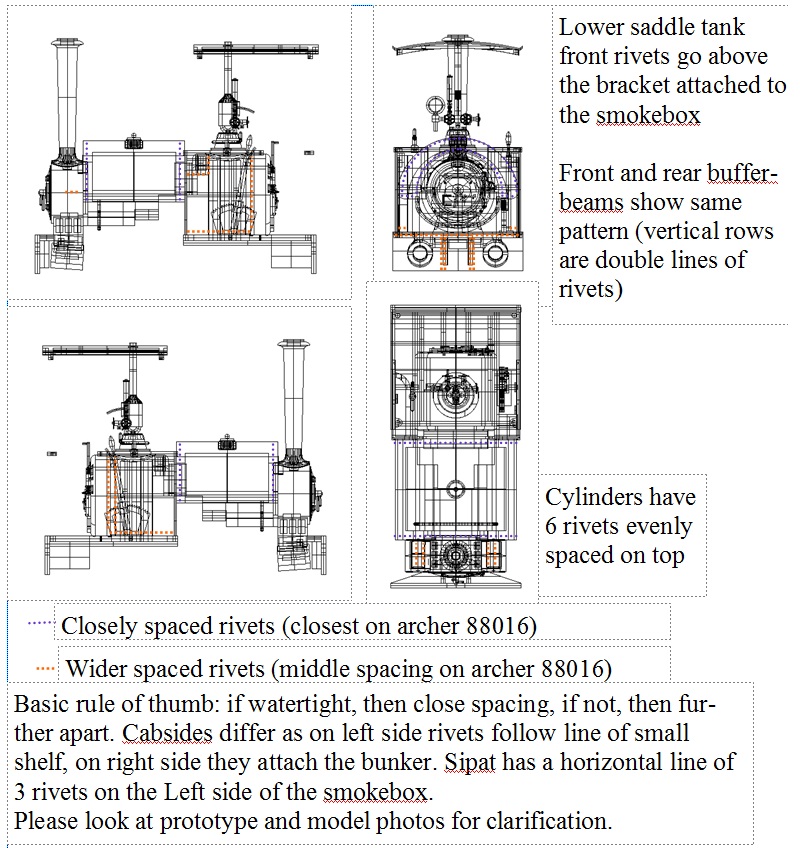
riveting diagram

This should enlarge when you click on it, I suggest you save it to your computer to use as a reference (saveable link below). It may not be perfect, due to the lack of photos of the prototype, nor have I counted the rivets, but it looks right and seems to make sense. This riveting diagram was done using the works photo of Sipat, Roy Link's drawing of the only slightly larger 20HP Bagnall (which superseded the Sipat class in the Catalogue) and pictures of larger Bagnall NG saddle tanks of similar time period.
| riveting_diagram.jpg |
Rivets on front

A horribly cruel close up of the rievts on the front of the saddle tank. These were dotted on with a cocktail stick dipped in Evo Stik wood glue, but show up well. The rivets on the bufferbeam are from the Archer transfers. The rivets are in the correct place according to the Roy Link drawing for the 20HP Bagnall that succeeded the Sipat in the catalogue as ther aren't many clear photos of the Sipat class, and the drawings I was working from were a pipe diagram. I think the bracket that holds the saddle tank to the smokebox may have countersunk bolts or rivets in it, but can't be sure.
Rear of open cab version
From the rear the shape of the motor is almost invisible, letting you have an open cabbed loco.
Cut the valve gear
Hopefully you can see where you need to cut the motion bracket from the fleischmann valve gear. If you're a better modeller than me you could add a lot more detail than I have, or scratchbuild some more complex valve gear, but I'm happy with it. The wagon is a Black Dog steel bodied tippler, whilst the other loco is Ozymandias, my Bagnall 040IST based on a combination of Rameses, the loco the Royal Engineers took to the Sudan and left abandoned at El Teb and Excelsior of L&B and Kerry Tramway fame. I'm afraid there are no plans for a commercial version of this, it is scratchbuilt onto another fleischmann 7000 converted to outside frames. Whilst building my second Sipat I discovered that on some fleischmann chassis the back of the crosshead is much thicker than on others. A quick check through my stock of 6 Fleischmann 7000s shwed that half had the thicker crosshead. If you fit the thicker crosshead to Sipat, then the coupling rod will foul the rear of the crosshead. The thinner variety doesn't suffer from this problem, and when I made my design I was unaware that there were two versions. If you are unlucky enough to have the thicker version then either file the rear of the crosshead down by about 0.5mm, or simply do not fit the coupling rods, you can't really see them anyway once the model is on the layout and running.
ready finished models
If you're not confident with finshing the model or modifying the chassis, then depending how busy I am with other commitments I may be able to supply you with a ready finished version. You'll need to get in touch using the form below. Please bear in mind that shapeways may take up to 3 weeks to print the model, plus I will have to source a chassis and that I have a day job and a family, so it may take a month or two so you may have to be a little patient.
